Make a lantern

Creative lanterns: two quick crafting instructions for the whole family

Text last updated: 2024-10-09

These lanterns are quick to make and inexpensive

When the leaves dance on the ground, the days get shorter and the first frost appears, they are not far away: the lantern processions for St. Martin's Day. The processions are twice as much fun with a homemade lantern. And afterwards, the shining works of art bring an atmospheric light into the dark season as decoration in the children's room.

Should it be a colorful umbrella or a sparkling reindeer this year? We have put together two simple step-by-step instructions that you can make together with your child.

Image
Image

Reindeer lantern Material list

Image

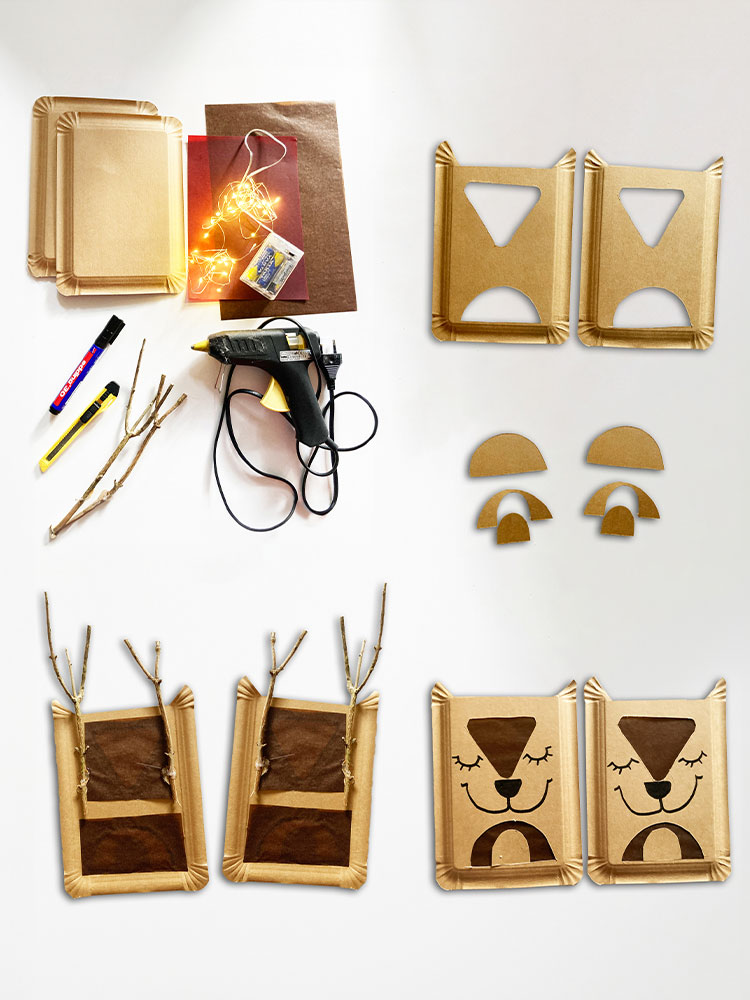
You will need the following craft supplies for the reindeer lantern:

  • Two flat, rectangular paper plates (approx. 16 x 23 cm)
  • brown, red or orange tracing paper
  • Scissors, cutter (for crafting assistance from parents)
  • glue and glue gun
  • string
  • thick black felt-tip pen
  • two small branches for the antlers
  • stick or branch to hold
  • LED fairy lights (small and battery-operated)

Step-by-step instructions for a reindeer lantern

  • Step 1:
    Cut out the two paper plates so that there are two small ears at the top. Now cut the forehead and a small semi-circle for the reindeer's belly out of the plates in a triangular shape. Glue tracing paper on the inside.
  • Step 2:
    Use the black felt-tip pen to draw the nose, mouth and eyes on the outside (the sides that curve upwards) of the paper plates.
  • Step 3:
    Now give the reindeer its antlers: glue the branches to the inside of a paper plate on the left and right.
  • Step 4
    Glue the paper plates together at the sides and bottom to create a pocket.
  • Step 5:
    Make a small hole through the paper plates above the reindeer's forehead and tie a loop to it, to which the stick or branch will later be attached.
  • Step 6:
    Carefully insert the fairy lights into the pocket. You can also wrap a section around the antlers. That's it!

Umbrella lantern Material list

Image

You will need the following craft supplies to make an umbrella lantern:

  • 3 paper plates
  • Scissors, glue and glue gun for children (alternatively a hot glue gun, although children should never use this alone)
  • Colorful tracing paper
  • Stick or branch
  • String
  • LED fairy lights (small and battery-operated)
  • Blue pompoms

Step-by-step instructions for an umbrella lantern

  • Step 1:
    Cut a paper plate in half and cut the bottom of each plate so that it looks like an umbrella. Then cut the handle of the umbrella out of another paper plate.
  • Step 2:
    Cut out large areas from the inside of the umbrella paper plate and stick colorful tracing paper behind it. This allows the umbrella to glow beautifully at the end!
  • Step 3:
    Tie or glue the pompoms to the fairy lights.
  • Step 4
    Now glue the handle to one half of the umbrella, attach the fairy lights inside and glue a fabric loop to the top, to which the branch or pole will be attached later. Now glue the second half of the umbrella on top and hang the colorful umbrella on a stick or branch.

"I walk with my lantern..." Tips for a successful lantern parade

To ensure that the children's eyes shine just as brightly as their lanterns during the St. Martin's procession, a few tips should be taken to heart:

  • The smaller the children, the smaller the procession should be. Ideally, lanterns should be walked in a small, manageable group in which the children show consideration for and wait for each other.
  • Dress warmly and weatherproof, possibly pack a thermos flask with hot tea.
  • Lantern sticks with battery-operated lights or LED fairy lights are more suitable for small children than real candles. The lantern itself should be as robust as possible.